
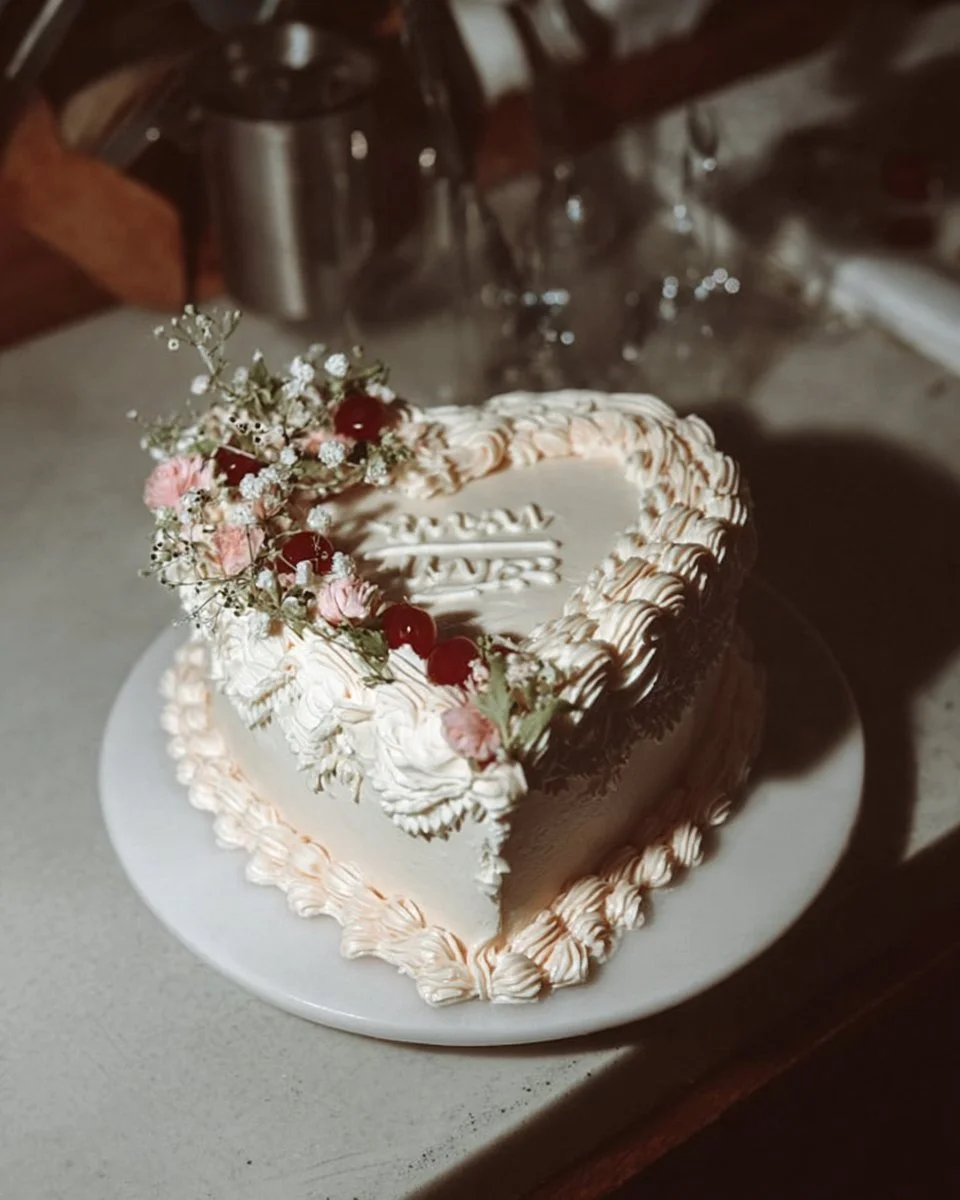
I still remember the first time I photographed this heart-shaped vintage wedding cake at Hanna Götz Studio — it felt like stepping into a living postcard. Delicate piped lace, soft blush tones, and a perfect heart silhouette made it a showstopper for intimate ceremonies and vintage-themed receptions. This recipe walks you through recreating that romantic look at home: a stable sponge base, classic Swiss meringue buttercream, raspberry jam filling, and the skills to stack and decorate a three-tier heart cake so it reads like a lovingly restored heirloom. If you like old-fashioned cakes with modern technique, also see this lovely lemon cottage cheese cake for another vintage-inspired dessert idea.
Why you’ll love this design
This cake blends visual romance with practical structure. The heart shape is instantly memorable without being gimmicky, and using a sturdy sponge plus Swiss meringue buttercream gives you a cake that slices cleanly and travels well. It’s ideal for:
- Small weddings and engagement parties where one statement cake is enough.
- Vintage or shabby-chic themes that favor muted pastels and piped lace.
- Couples who want a classic flavor profile (vanilla + raspberry) with professional-looking decoration you can achieve at home.
Quote: “Guests told me it tasted like my grandmother’s wedding cake — but prettier.” — a frequent compliment from intimate-reception bakers.
How this recipe comes together
Step-by-step overview
- Bake three heart-shaped sponge layers (large, medium, small) using a simple creamed-butter method for tender crumb and reliable rise.
- Level and stack each tier with a thin layer of jam and Swiss meringue buttercream for stability and flavor.
- Crumb-coat, chill, then apply a final smooth buttercream finish.
- Pipe vintage lace motifs and attach sugar flowers or fresh blooms for the finished look. This approach keeps assembly linear: bake → cool → fill → stack → decorate. Expect about 4–6 hours active spread across two days if you do chilling and decorating separately.
What you’ll need
Ingredients (for a three-tier heart cake: 6″, 8″, 10″)
- For the sponge (multiply or scale down to your pan sizes):
- 6 large eggs, room temperature
- 600 g (3 cups) granulated sugar
- 600 g (4 1/2 cups) all-purpose flour, sifted
- 450 g (2 cups) unsalted butter, softened
- 240 ml (1 cup) whole milk, warm
- 2 tbsp baking powder
- 2 tsp vanilla extract
- 1/2 tsp fine sea salt
- Raspberry filling:
- 300 g fresh or frozen raspberries
- 75 g sugar
- 1 tbsp lemon juice
- 1 tsp cornstarch (slurry if needed)
- Swiss meringue buttercream:
- 300 g egg whites (about 10 large egg whites) — OR make two batches scaled to the cake size
- 600 g caster sugar
- 900 g unsalted butter, softened and cut into chunks
- 2 tsp vanilla extract
- Pinch salt
- For decoration:
- Gel food color (soft blush, ivory)
- Piping tips (small round and petal/lace tips)
- Floral tape and non-toxic floral picks if using fresh flowers
- Dowels or straws and cake boards sized for each tier
Substitutions/notes:
- For a quicker buttercream, American buttercream works, but Swiss meringue is preferred for smoothness and less sweetness.
- For gluten-free, substitute a 1:1 gluten-free flour blend and add 1/2 tsp xanthan gum if not included.
Step-by-step instructions
- Prep and pans: Grease three heart-shaped pans (6″, 8″, 10″) and line bottoms with parchment. Preheat oven to 175°C (350°F).
- Make the sponge: Cream the butter and sugar until pale and fluffy (4–6 minutes). Add eggs one at a time, scraping down the bowl. Stir in vanilla. Whisk flour, baking powder, and salt; alternately add dry mix and warm milk in three additions, mixing gently until combined.
- Bake: Divide batter between pans (use kitchen scale for even layers). Bake 6″ for ~18–22 minutes, 8″ for ~25–30 minutes, 10″ for ~30–36 minutes, or until a skewer comes out clean and tops spring back.
- Cool: Let cakes rest 10 minutes in pans, then invert onto racks to cool completely before leveling.
- Prepare filling: Simmer raspberries with sugar and lemon until softened. If too runny, thicken with a cornstarch slurry. Chill to spreadable jam consistency.
- Make Swiss meringue buttercream: Over a bain-marie whisk egg whites and sugar until warm (about 70°C/160°F) and sugar dissolves. Whisk to form glossy stiff peaks (use stand mixer). Switch to low speed and add butter, a few pieces at a time, until smooth. Add vanilla and salt. If it breaks, chill briefly and re-whip.
- Level and fill: Level layers with a serrated knife. Place the 6″ layer on a 6″ cake board; spread a thin layer of buttercream, a thin layer of raspberry filling, then a final thin skim of buttercream to seal. Repeat for 8″ and 10″ tiers.
- Stack safely: Insert a few dowels into the 10″ tier to support the 8″ tier, place 8″ on a board and dowel, then repeat for 6″. Ensure each tier has a supporting board the same diameter as the tier.
- Crumb coat: Apply a thin crumb coat to each tier, chill 20–30 minutes until set.
- Final coat and decoration: Smooth a final layer of buttercream. Tint a portion blush for contrast. Pipe lace motifs and borders with small round tips; use petal tips for scalloped edges. Add sugar flowers or properly prepared fresh flowers.
- Chill briefly before serving to set the decorations, but bring to room temperature 30–60 minutes before slicing for the best texture.
How to plate and pair
Best ways to enjoy it Serve thin slices to let guests savor the raspberry-hit between sponge layers. Pair with:
- A light Champagne or a dry Prosecco — bubbles cut the buttercream richness.
- Brewed Earl Grey or Darjeeling for a tea service.
- For dessert-for-two after a big meal, plate with a few fresh berries and a mint sprig. If you want a contrasting, lighter course for the dessert table, consider offering banana cottage cheese pancakes as an alternative small-plate sweet.
Storage and reheating tips
Keeping leftovers fresh
- Room temp: If your venue is cool and the cake won’t be in direct sunlight, the cake can sit out up to 4 hours safely thanks to the stabilizing buttercream.
- Refrigeration: For longer storage (up to 3–4 days), cover the cake loosely with a cake dome or tented foil and refrigerate. Bring to room temperature 1–2 hours before serving for best texture.
- Freezing: You can freeze individual slices wrapped tightly in plastic and foil for up to 2 months. Thaw overnight in the fridge and bring to room temp before serving. Food safety: If using fresh flowers, ensure they are non-toxic and that stems do not contact the cake directly — use floral picks or a barrier. Keep perishable fillings refrigerated if not served within a few hours in warm conditions.
Helpful cooking tips
Pro chef tips
- Always weigh ingredients when possible; cakes are sensitive to ratios. A kitchen scale yields the most consistent layers.
- Use a turntable and a bench scraper for ultra-smooth buttercream finishes.
- Chill between steps: a quick chill after crumb coat makes final smoothing far easier.
- If your buttercream becomes soupy, a 20–30 minute chill and re-whip usually restores texture.
- Mark the center of each heart with a small dab of buttercream when stacking to keep tiers aligned.
Creative twists
Flavor swaps and variations
- Lemon-raspberry: Fold lemon zest into the sponge and use lemon curd instead of jam.
- Chocolate vintage: Use an espresso-infused chocolate sponge with salted caramel buttercream for a richer take.
- Vegan option: Make a vegan sponge with flax “eggs,” plant butter, and aquafaba-based Swiss-style buttercream.
- Naked cake look: Skip the full outer coat and leave a thin “naked” finish with exposed layers for a rustic vintage vibe.
- Single-tier version: Make one large 10″ heart and double the filling for fewer servings but the same visual impact.
Helpful answers
FAQ Q: Can I make this a one-day project? A: Yes, but it’s intensive. Bake in the morning, make buttercream while cakes cool, and decorate in the afternoon. For less stress, split into two days: bake and fill on day one, decorate on day two.
Q: How do I transport a tiered heart cake? A: Transport tiered cakes stacked on a non-slip mat inside a level box. Chilled cakes handle movement better. For longer trips, transport tiers separately and stack on-site.
Q: What’s the best way to get nice piped lace? A: Use a small round tip (size 1–2) for dots and a petal or small star for scallops. Practice on parchment, then transfer designs with confidence. Consistent pressure is key.
Q: Can I substitute store-bought jam? A: Yes—use a good-quality jam that’s not too runny. If it’s very loose, reduce it on the stove to a thicker spreadable consistency.
Q: How far in advance can I make this cake for a wedding? A: You can bake and freeze sponge layers up to one month ahead. Swiss meringue buttercream is best made within 3–4 days. Many bakers assemble and decorate the day before the event and add final florals on the wedding day.
Conclusion
For more inspiration on heart-shaped wedding cakes and vintage styles, check out this curated list of 13 heart-shaped wedding cakes to spark color palettes and decoration ideas.
Print
Heart-Shaped Vintage Wedding Cake
- Total Time: 300 minutes
- Yield: 12 servings
- Diet: Vegetarian
Description
A stunning three-tier heart-shaped cake with a stable sponge base, Swiss meringue buttercream, and raspberry jam filling, perfect for vintage-themed weddings.
Ingredients
- 6 large eggs, room temperature
- 600 g (3 cups) granulated sugar
- 600 g (4 1/2 cups) all-purpose flour, sifted
- 450 g (2 cups) unsalted butter, softened
- 240 ml (1 cup) whole milk, warm
- 2 tbsp baking powder
- 2 tsp vanilla extract
- 1/2 tsp fine sea salt
- 300 g fresh or frozen raspberries
- 75 g sugar
- 1 tbsp lemon juice
- 1 tsp cornstarch (slurry if needed)
- 300 g egg whites (about 10 large egg whites)
- 600 g caster sugar
- 900 g unsalted butter, softened and cut into chunks
- 2 tsp vanilla extract
- Pinch salt
- Gel food color (soft blush, ivory)
- Piping tips (small round and petal/lace tips)
- Floral tape and non-toxic floral picks if using fresh flowers
- Dowels or straws and cake boards sized for each tier
Instructions
- Grease three heart-shaped pans (6″, 8″, 10″) and line bottoms with parchment. Preheat oven to 175°C (350°F).
- Cream the butter and sugar until pale and fluffy (4–6 minutes). Add eggs one at a time, scraping down the bowl. Stir in vanilla.
- Whisk flour, baking powder, and salt; alternately add dry mix and warm milk in three additions, mixing gently until combined.
- Divide batter between pans and bake: 6″ for ~18–22 minutes, 8″ for ~25–30 minutes, 10″ for ~30–36 minutes, or until a skewer comes out clean.
- Let cakes cool in the pans for 10 minutes, then invert onto racks to cool completely.
- Simmer raspberries with sugar and lemon until softened, thicken with cornstarch if necessary, and chill to spreadable consistency.
- Prepare Swiss meringue buttercream: Over a bain-marie, whisk egg whites and sugar until warm and sugar dissolves. Whisk to form stiff peaks, then add butter until smooth. Add vanilla and salt.
- Level layers with a serrated knife. Place the 6″ layer on a board; spread with buttercream, then raspberry filling, then a final buttercream layer. Repeat for 8″ and 10″ tiers.
- Insert dowels into the 10″ tier to support the 8″ tier, then stack the tiers, ensuring each has a supporting board.
- Apply a thin crumb coat to each tier and chill for 20–30 minutes until set.
- Smooth a final layer of buttercream, tinting a portion blush for contrast. Pipe designs and add flowers.
- Chill briefly and let sit at room temperature before serving.
Notes
For gluten-free, substitute with gluten-free flour blend and xanthan gum. Chill between steps to ensure smooth buttercream finishes.
- Prep Time: 180 minutes
- Cook Time: 120 minutes
- Category: Dessert
- Method: Baking
- Cuisine: American